Our Tesla process
A Tesla windshield replacement is more than glass.
Tesla windshield replacement involves more than simply installing new glass. Your Tesla's advanced camera systems require specialized procedures to help ensure they function properly after installation.
At Blue Chip Auto Glass, we follow Tesla's official service procedures outlined at https://service.tesla.com/. Our Tesla-specific replacement process includes pre- and post-installation diagnostics, careful handling of the forward-facing camera assembly, camera alignment verification using Tesla's Camera Calibration Target, and the appropriate camera recalibration procedures.
Here's a step-by-step look at how we replace your Tesla's windshield and verify its camera systems before returning your vehicle.
Pre- & post-installation diagnostic documentation
Before work
Pre-scan
Existing DTCs & active alerts photographed
After calibration
Post-scan
Results photographed & compared
Phase 1
Inspection, Diagnostics & Protection
- 1
Step 1
Vehicle Inspection & Pre-Scan Documentation
Before beginning any work, our technicians carefully inspect your Tesla's interior and exterior for existing damage.
We photograph the vehicle to document its condition before the installation begins.
For Tesla vehicles, we take an additional step.
Using Tesla's Service Mode, we access the vehicle's Diagnostic Trouble Codes (DTCs) and Active Alerts.
We photograph the diagnostic information to document any existing faults or alerts before work begins.
This gives both our technicians and our customers a clear record of the vehicle's condition before installation.
After completing the windshield replacement and calibration, we perform a second diagnostic check and document the results.
If new alerts appear, we can investigate whether they are related to the work performed.
Tesla-specific step
Pre- & Post-Installation Diagnostic Documentation
We document your Tesla's existing diagnostic alerts before beginning work and compare them with a post-installation scan.
Why it matters
Pre- and post-installation diagnostics provide transparency, accountability, and an additional level of quality control.
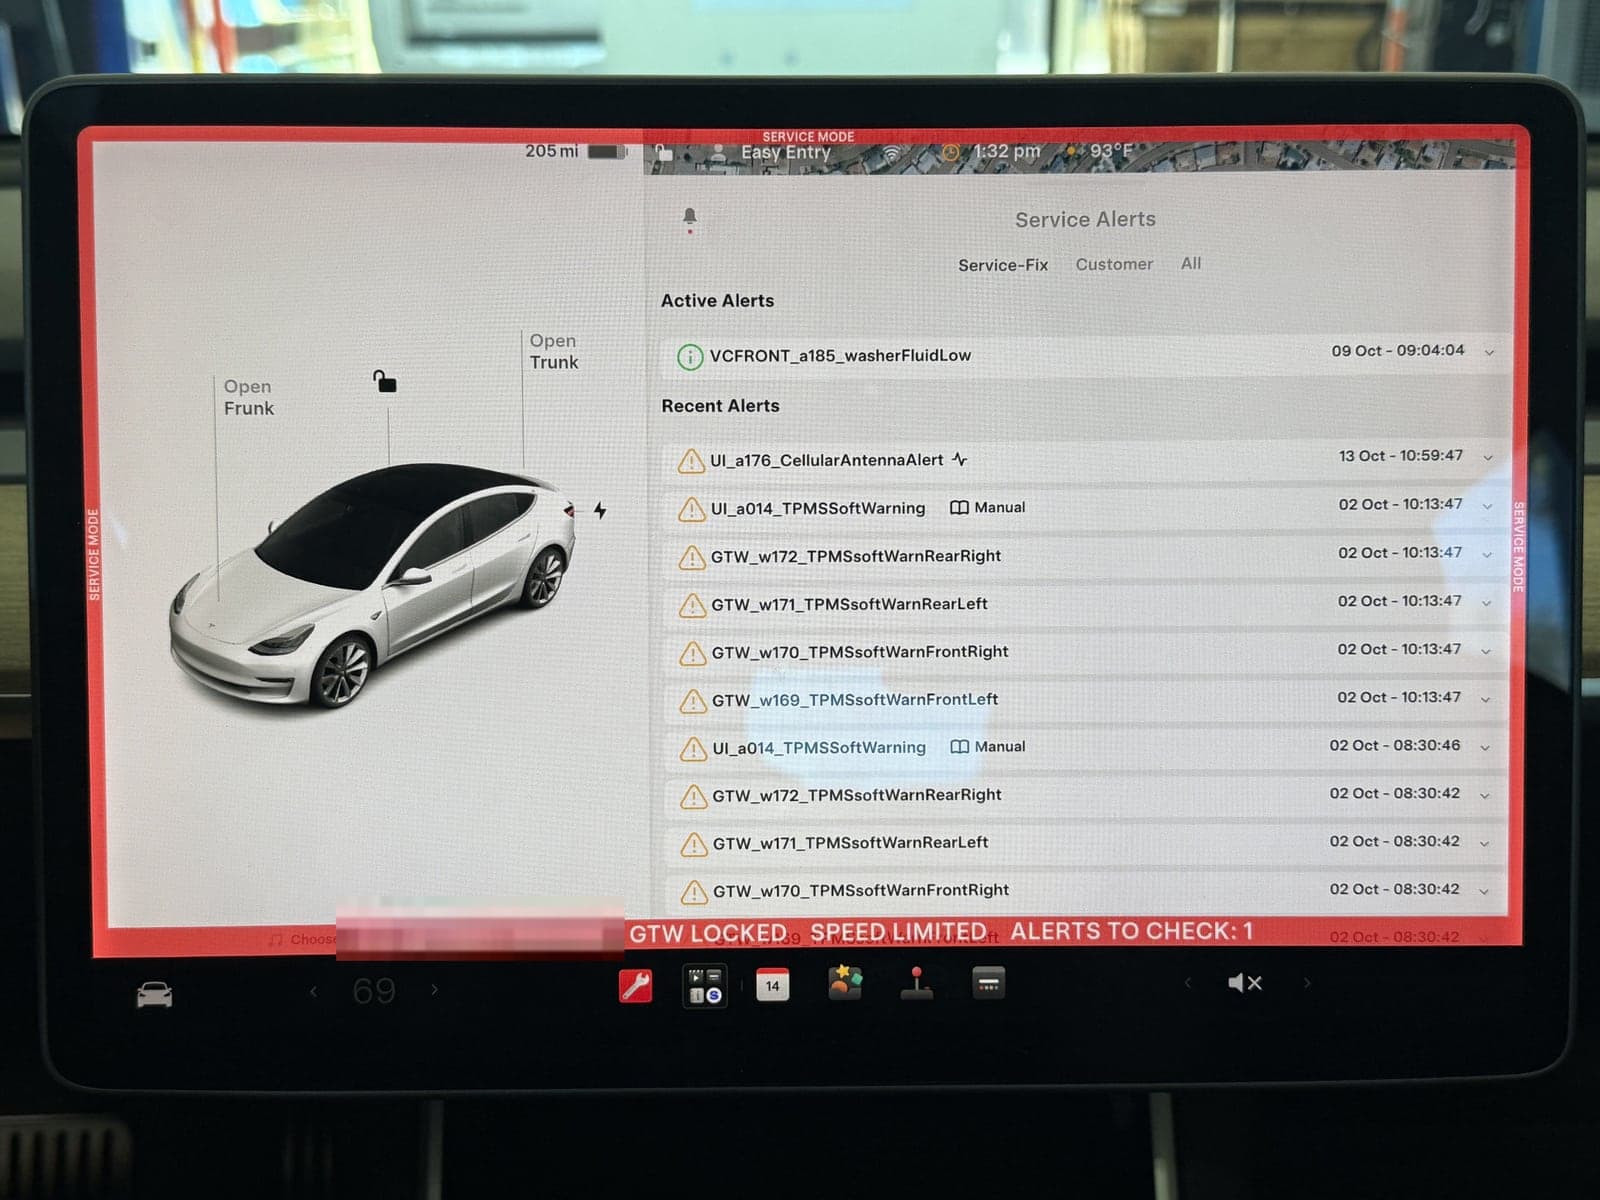
Our pre-scan: the Service Alerts screen, photographed before work begins. We take an identical photo after the job is complete. - 2
Step 2
Inspecting Your Replacement Tesla Windshield
Before installation, we put your new Tesla windshield on our inspection stand, under high-intensity lighting, then clean and inspect it. We do this individually for every piece of glass we get, Tesla or not.
We check for scratches, optical distortion, manufacturing defects, and other imperfections.
Our replacement glass is inspected before scheduling your appointment to help prevent unnecessary delays.
Why it matters
We want to identify glass defects before the windshield is installed, not afterward.
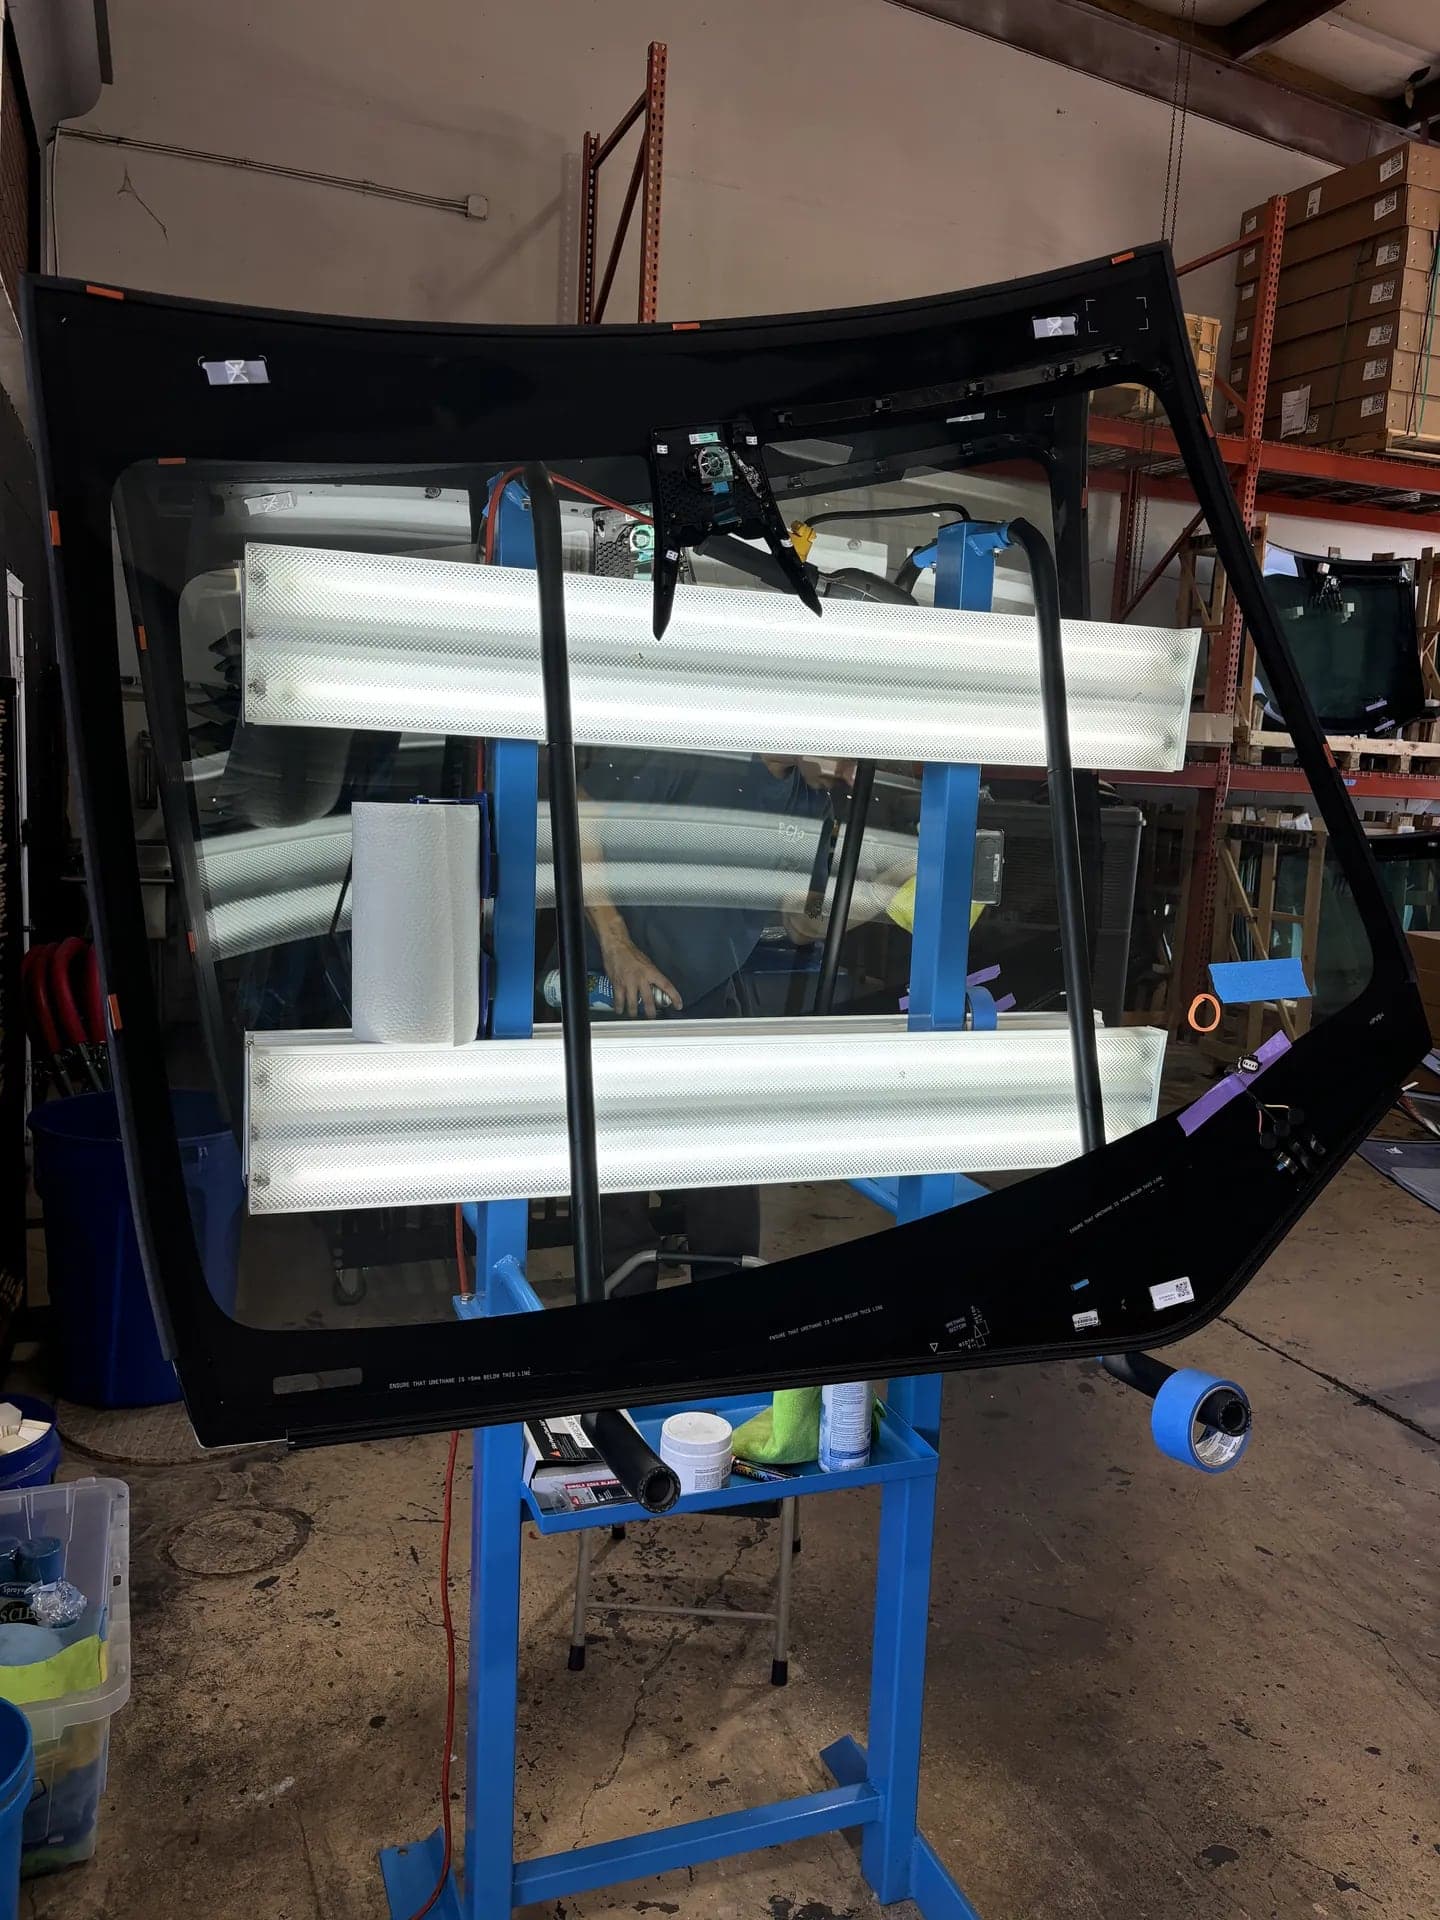
A new Tesla windshield on our inspection stand, under high-intensity lighting,. - 3
Step 3
Protecting Your Tesla
Before beginning the removal process, we install protective dashboard mats and seat covers.
These coverings help protect your Tesla's interior surfaces from tools, dust, and installation-related debris.
Why it matters
Your vehicle deserves careful handling throughout the entire installation process.
Phase 2
Windshield Removal & Preparation
- 4
Step 4
Removing the Wipers & Cowl
We carefully remove the windshield wipers and cowl panel, where applicable, to provide our technicians with better access to the lower windshield bonding area.
Some installers leave the cowl in place and attempt to slide the replacement windshield underneath it.
At Blue Chip, we take the additional time to remove these components when appropriate to maximize working clearance.
Why it matters
Better access allows for more controlled windshield removal, surface preparation, and installation.
- 5
Step 5
Removing the Rearview Mirror & Tesla Camera Assembly
Tesla vehicles have forward-facing cameras mounted near the rearview mirror that support Autopilot and other driver assistance features.
Our technicians carefully remove the rearview mirror, camera covers, and the Tesla Forward-Facing Camera Assembly from the original windshield, following the applicable vehicle-specific procedure.
The camera assembly requires particular attention because its position and mounting directly affect camera alignment.
We carefully transfer the camera assembly to the new windshield before installing the replacement glass.
Depending on the vehicle's configuration, the camera assembly and mounting components may differ.
Tesla-specific step
Camera assembly transfer
Your Tesla's forward-facing camera assembly is carefully moved from the original windshield to the new one, following the vehicle-specific procedure.
Why it matters
Proper camera handling and positioning are essential to the subsequent calibration and verification procedures.
- 6
Step 6
Removing the Original Windshield
Our technicians use professional windshield removal equipment to cut through the existing urethane adhesive.
Depending on the vehicle and accessibility, we may use:
- Express windshield removal tools.
- Cold knives.
- BAT cord-cutting systems.
We select the appropriate equipment to minimize unnecessary contact with surrounding components.
Why it matters
Proper removal techniques help protect the vehicle's paint, interior, and windshield frame.
- 7
Step 7
Preparing & Cleaning the Pinchweld
Once the original windshield has been removed, we prepare the pinchweld—the metal frame surrounding the windshield opening.
Our typical process involves removing the existing urethane bead, subject to the adhesive manufacturer's approved preparation requirements.
We then clean the bonding area, removing loose debris and contaminants.
Our technicians inspect the pinchweld for exposed metal, scratches, and corrosion.
All surfaces are prepared and dried according to the applicable adhesive manufacturer's instructions before bonding.
Why it matters
Proper surface preparation is essential to creating a secure adhesive bond.
- 8
Step 8
Corrosion Treatment & Priming
At Blue Chip, we incorporate the appropriate priming procedures into every windshield replacement.
If we discover existing surface rust, we don't simply cover it with primer.
We mechanically remove the corrosion where appropriate, prepare the affected area, and apply the required corrosion protection and bonding products.
More extensive corrosion may require additional repairs before installation.
All primers and treatments are applied according to the adhesive manufacturer's specifications.
Why it matters
Properly addressing corrosion helps protect the windshield bonding area and supports long-term installation quality.
Phase 3
Windshield Installation & Reassembly
- 9
Step 9
Preparing the New Tesla Windshield
Before installation, we prepare the replacement windshield's bonding surface using the appropriate cleaning products, activators, and primers specified by our adhesive manufacturer.
The transferred camera assembly is checked for proper seating and secure attachment.
Why it matters
Both adhesive preparation and camera positioning are important to a successful Tesla windshield installation.
- 10
Step 10
Applying High-Strength Urethane
We apply a continuous bead of professional automotive-grade urethane adhesive to the designated bonding surface.
We use professional adhesive systems from manufacturers such as Sika and DOW.
Why it matters
Windshield urethane is a structural adhesive that helps secure the glass to the vehicle and maintain the integrity of the installation.
Learn why windshield urethane is important. - 11
Step 11
Installing & Aligning the New Windshield
Our technicians carefully position the replacement windshield and verify proper alignment, spacing, and fitment.
Any necessary adjustments are completed within the adhesive manufacturer's permitted working time.
Why it matters
Proper positioning helps ensure consistent adhesive contact, correct fitment, and a professional finished appearance.
- 12
Step 12
Reassembling Your Tesla
Once the new windshield is installed, we reinstall the components removed during the replacement process.
These may include:
- Rearview mirror.
- Camera covers.
- Windshield cowl.
- Windshield wipers.
- Interior trim and related components.
- Reconnection of wiring harnesses and electrical connectors.
We verify that everything is properly secured and positioned.
Why it matters
Careful reassembly helps preserve your Tesla's original appearance and ensures the components are returned to their correct positions.
Phase 4
Tesla Camera Calibration & Final Verification
What sets our Tesla process apart
Beyond a Calibration Reset
We use an approved Tesla Calibration Target to verify camera alignment, document the results, and perform the applicable road calibration procedures. If the camera pitch is outside Tesla's recommended range, our technicians adjust it using Tesla's pitch adjustment wrench.
- 1
Calibration reset
Initiate the applicable camera calibration procedure.
- 2
Physical camera pitch verification
Verify camera alignment using Tesla's Camera Calibration Target and adjust if necessary.
- 3
Road calibration
Perform the applicable driving calibration and review the results.
At Blue Chip Auto Glass, we complete the applicable static and dynamic portions of the recalibration process to verify camera alignment and calibration performance. We also prepare a comprehensive recalibration report documenting the procedures performed and their results for the customer and/or insurance company.
- 13
Step 13
Resetting the Tesla Camera Calibration
Following windshield replacement, our technicians access the vehicle's touchscreen interface to initiate the applicable camera calibration procedure.
This clears the previous camera calibration data when required, allowing the vehicle to establish updated calibration information.
Why it matters
Recalibration helps ensure the cameras are correctly aligned for the vehicle's driver assistance systems.
- 14
Step 14
Tesla Camera Pitch Verification & Road Calibration
We don't just reset your Tesla's camera calibration and send you on your way
We verify the physical alignment of the cameras using Tesla's specialized calibration equipment.
After installing your new windshield, our technicians perform a forward-facing camera pitch verification using a Tesla Camera Calibration Target, following the manufacturer's procedures.
This specialized equipment allows us to verify the vertical alignment, or pitch, of your Tesla's forward-facing cameras.
Camera Pitch Verification
Depending on your Tesla's model, year, and camera hardware, the verification process may involve checking multiple cameras.
Our technicians position the Camera Calibration Target in front of the vehicle and use Tesla's Service Mode to examine the camera images against the manufacturer's alignment specifications.
For applicable vehicles, this includes verifying the alignment of the main and narrow forward-facing cameras.
We photograph the verification results to document the camera alignment.
If the camera pitch is outside Tesla's recommended range, our technicians adjust it using Tesla's pitch adjustment wrench, following the applicable vehicle-specific procedure, then repeat the verification.
Road Calibration
Once camera pitch verification is complete, we proceed with the required camera calibration process.
Our technicians perform a road test under suitable driving conditions, allowing the vehicle's cameras to recalibrate.
We monitor the calibration status through Tesla's interface and verify completion whenever possible.
Depending on the vehicle and driving conditions, calibration may require additional driving.
If it cannot be completed during our road test, we explain the remaining requirements to the customer.
Why it matters
Your Tesla's forward-facing cameras play an important role in Autopilot and other camera-based driver assistance features. Resetting camera calibration alone does not verify that the cameras are physically aligned correctly. That's why our Tesla windshield replacement process includes both camera pitch verification and the applicable road calibration procedures.
Setting up the target
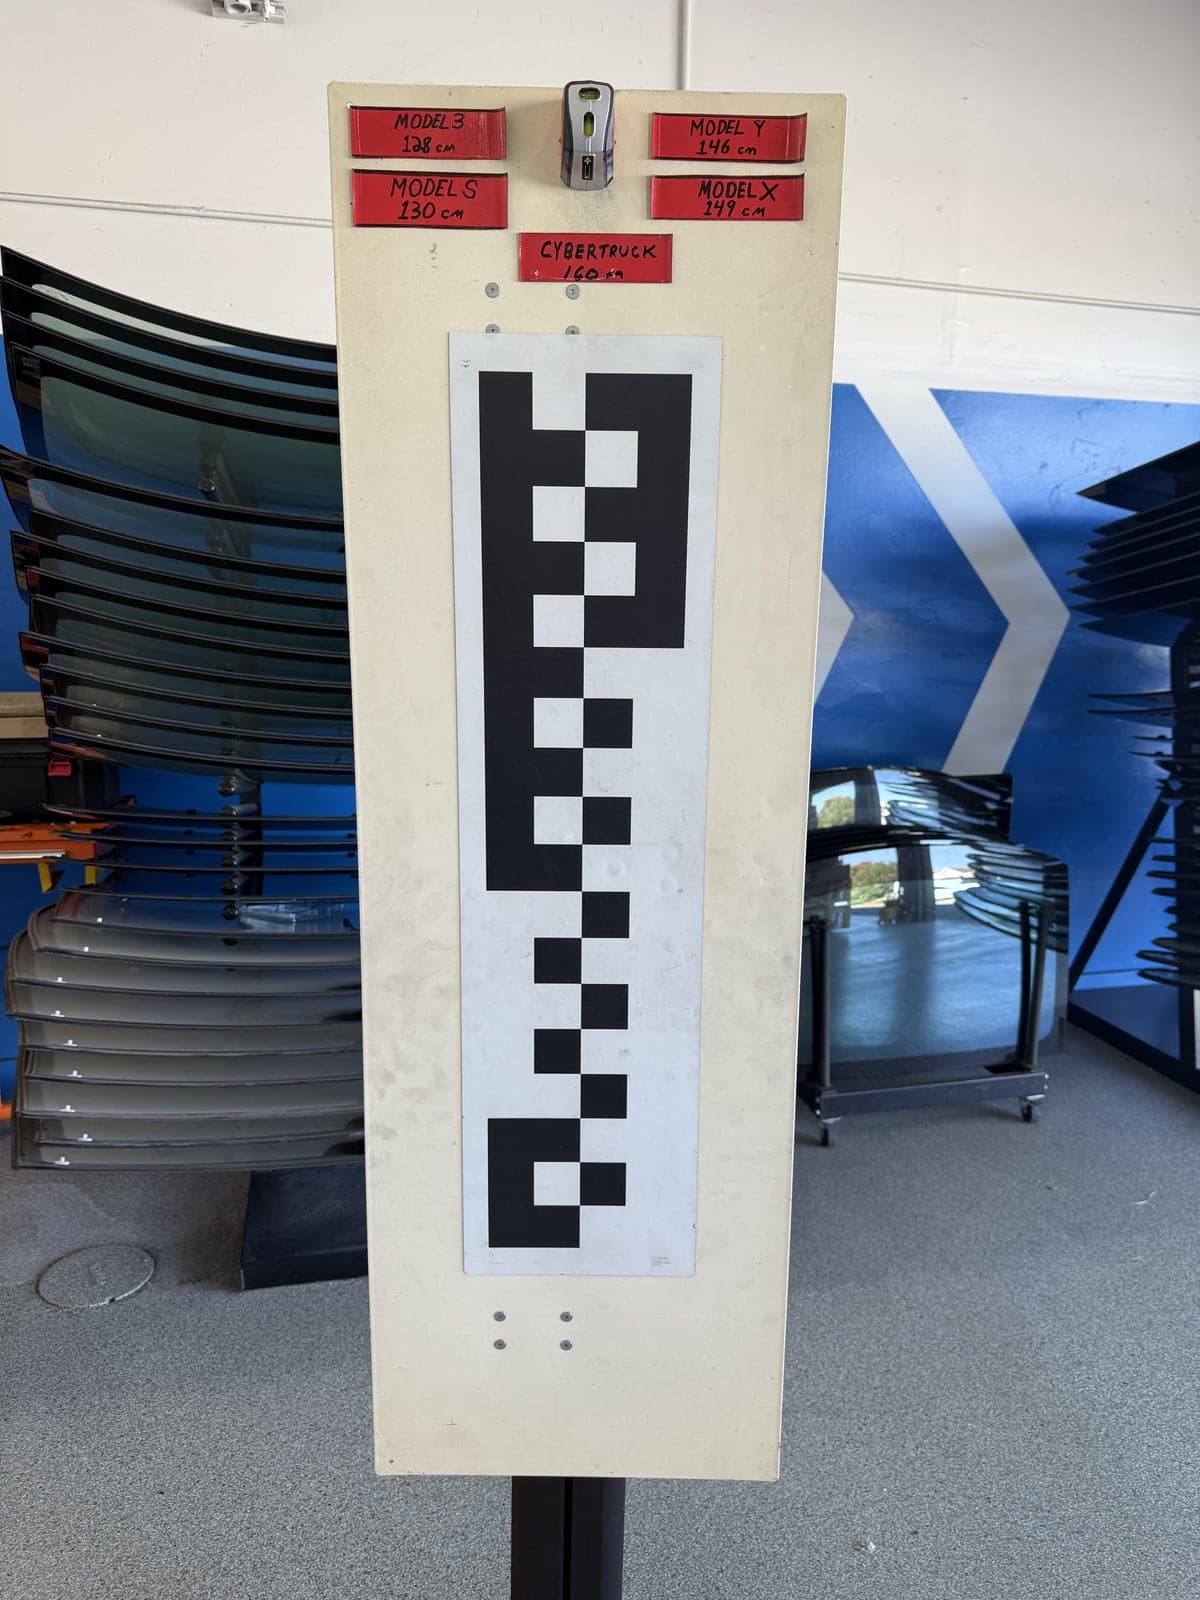
The Camera Calibration Target we use, from Tesla. 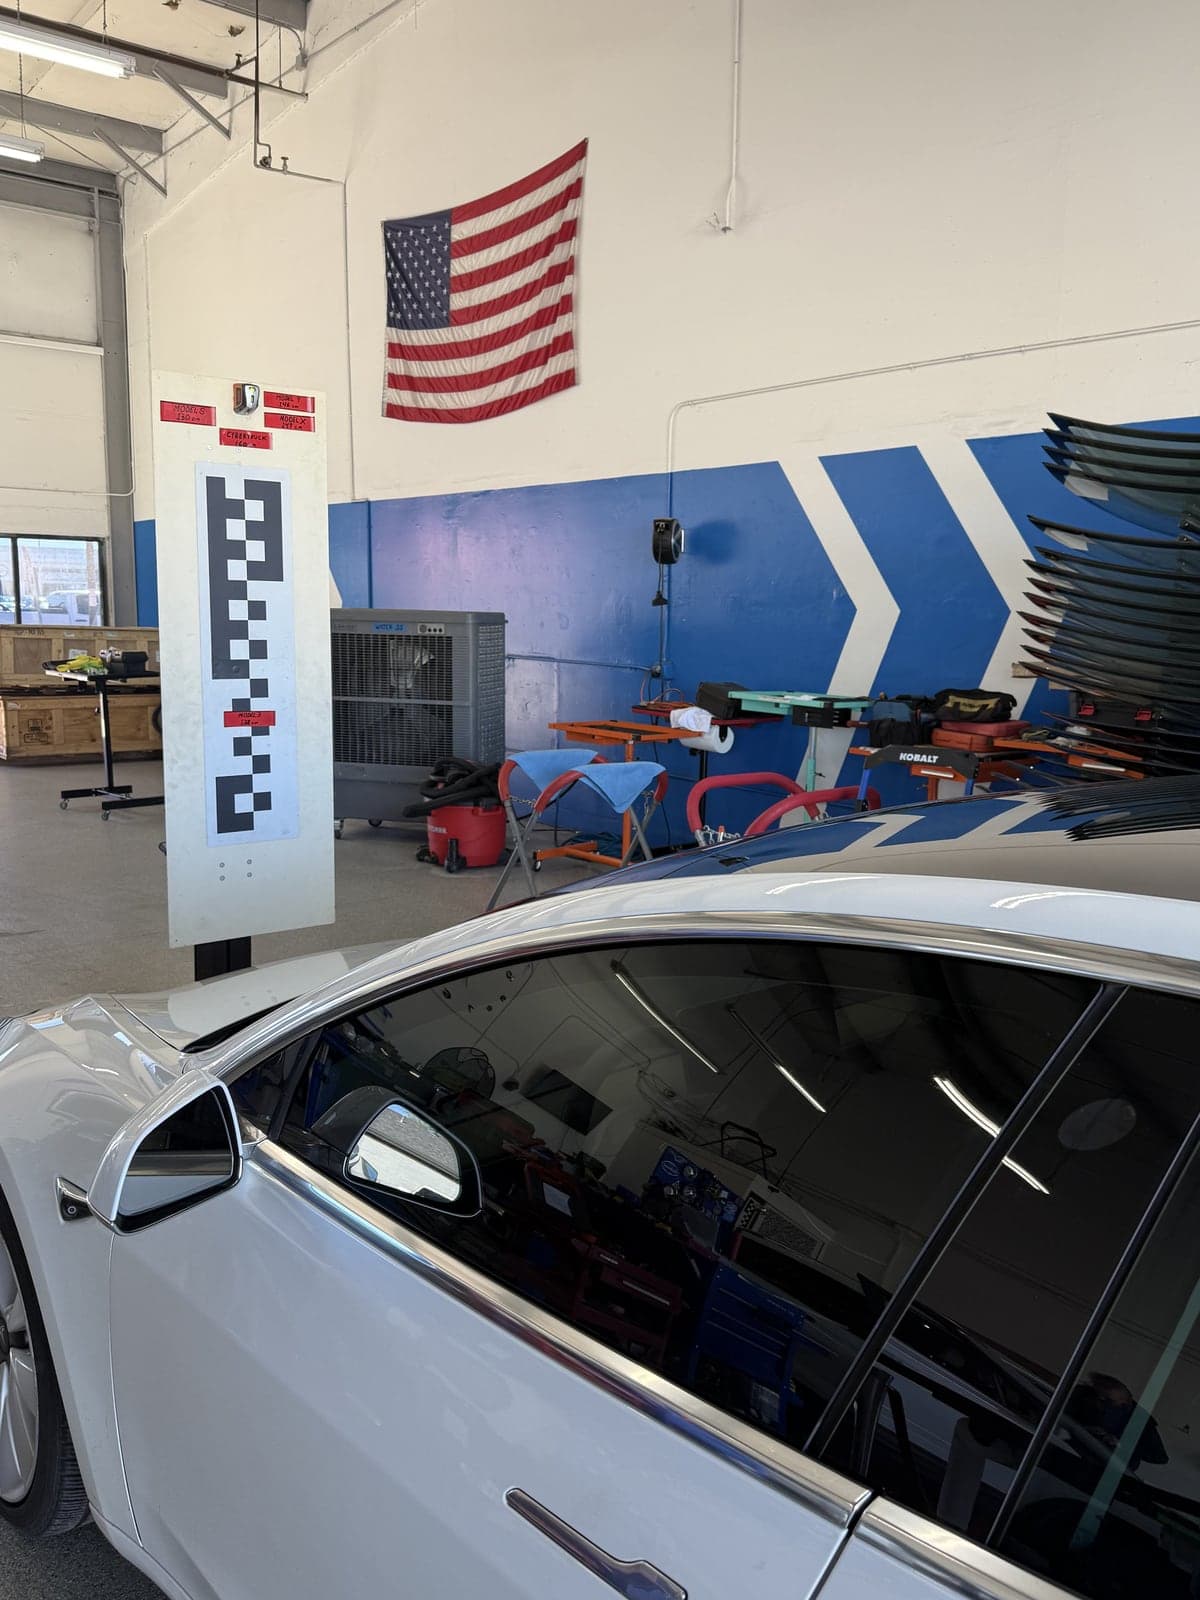
Set up in front of the car at the correct height. Each Tesla model has its own pitch verification height. 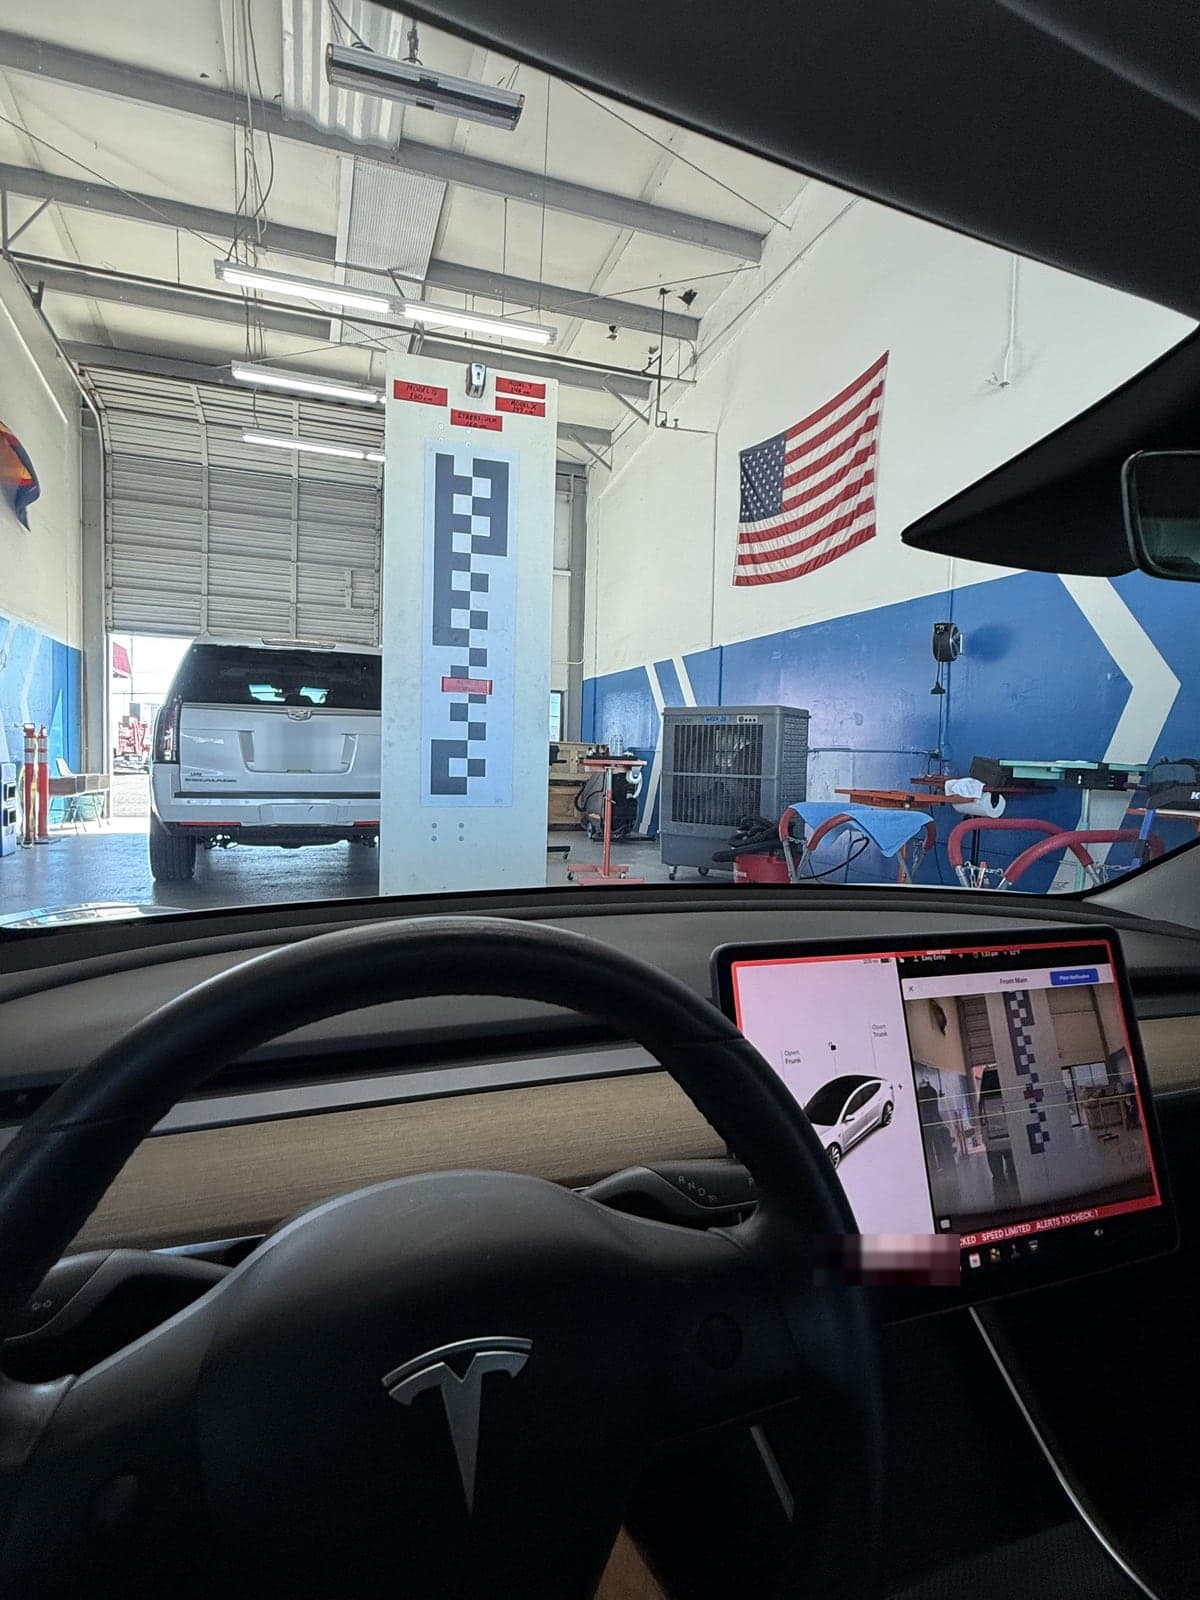
Checking the target through the new windshield. Pitch verification, one camera at a time
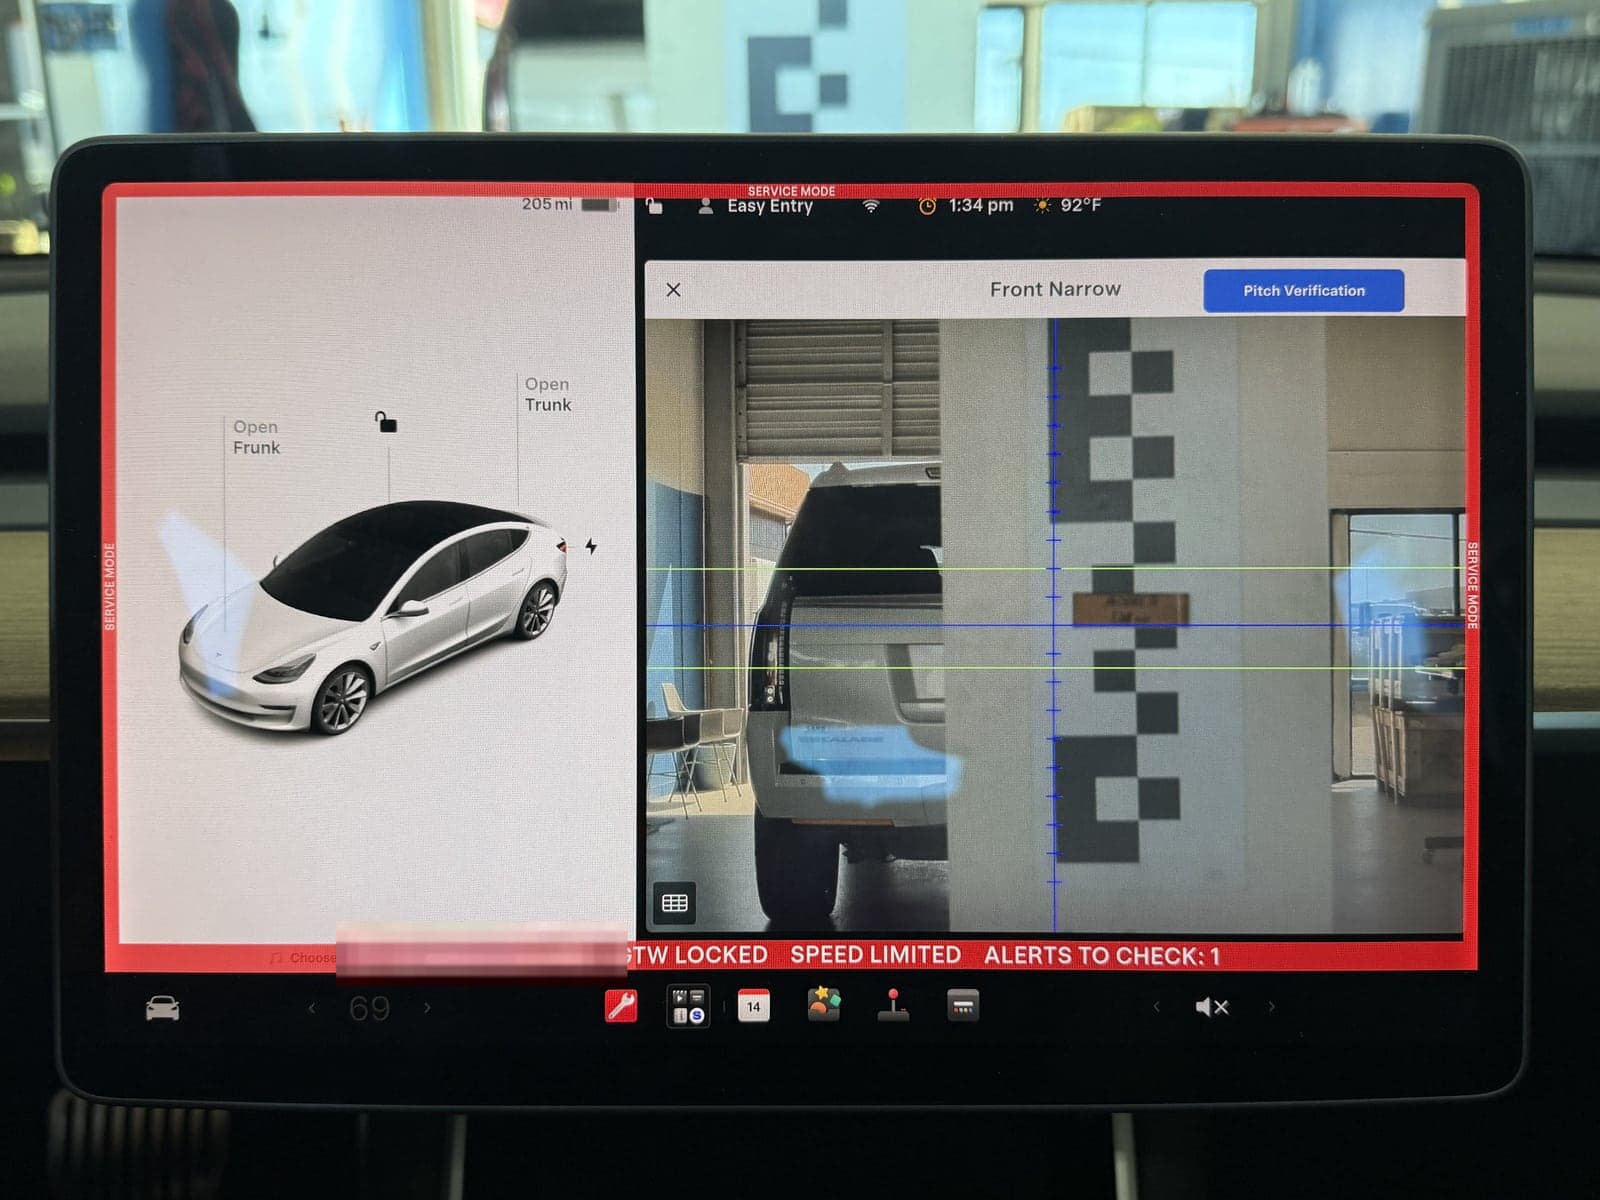
1 of 3: Front Narrow camera. 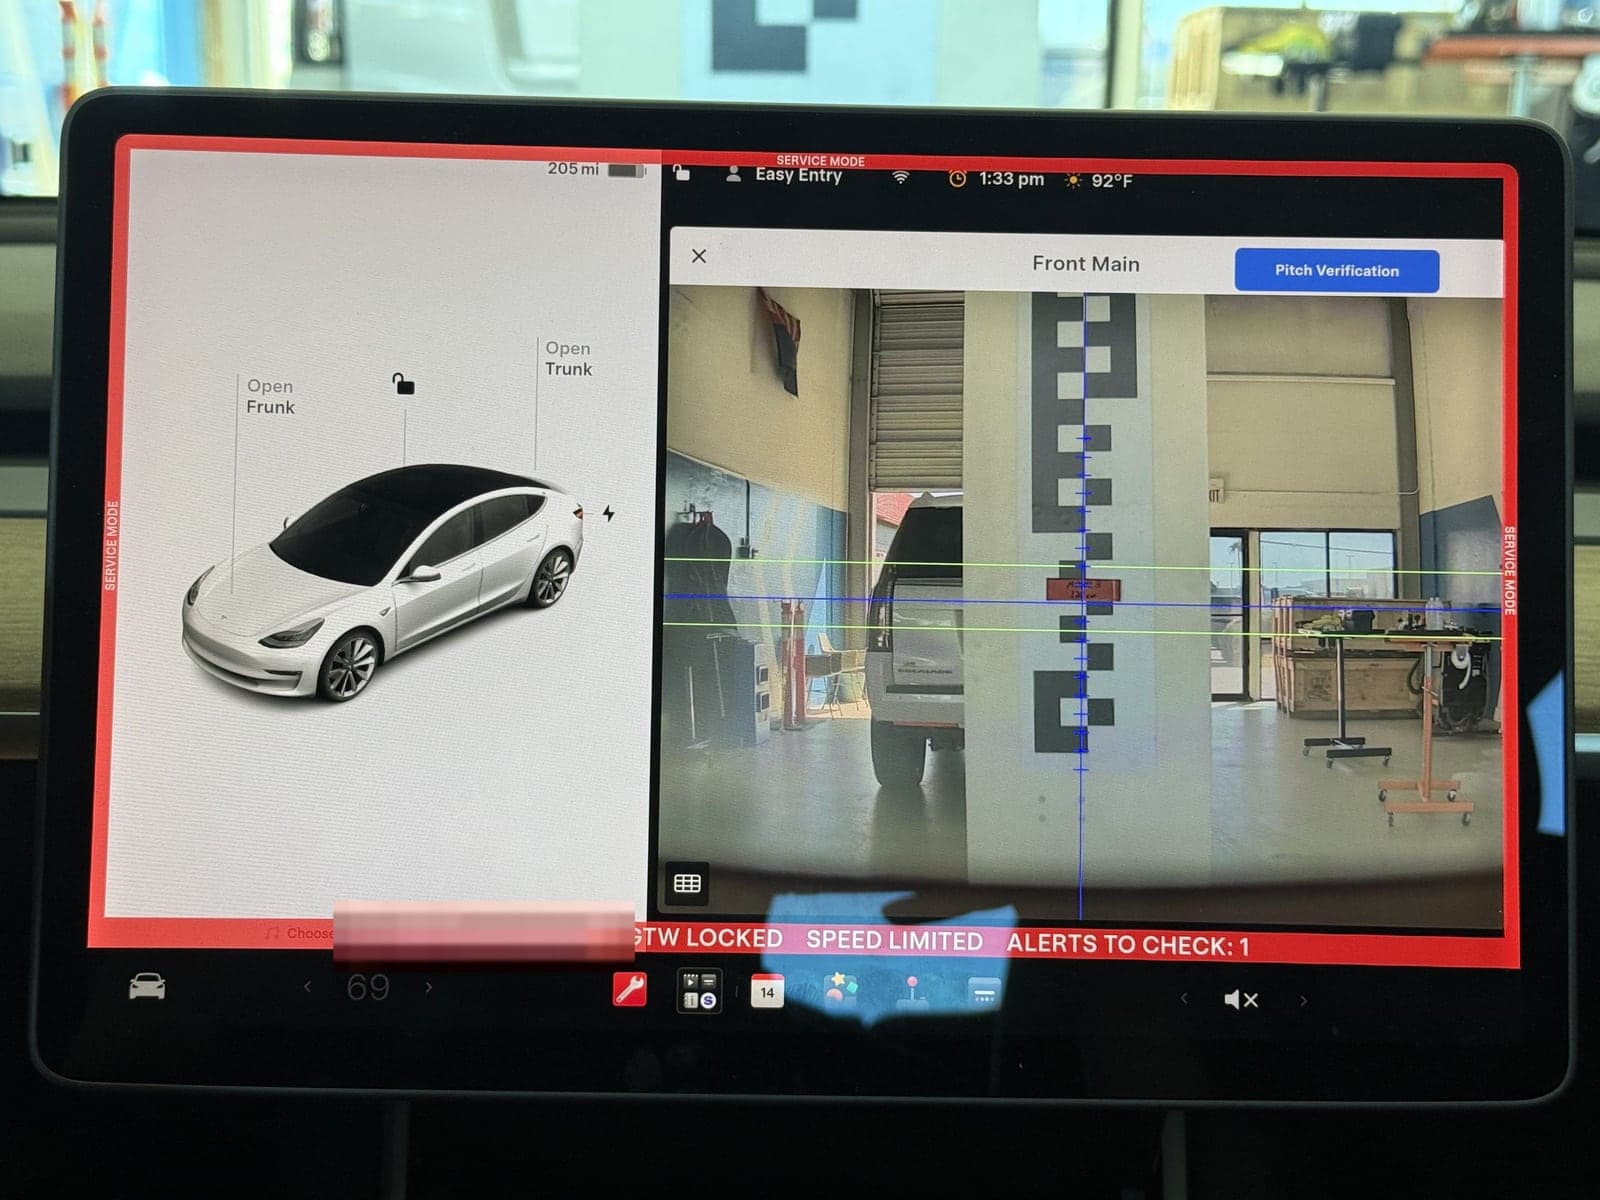
2 of 3: Front Main camera. 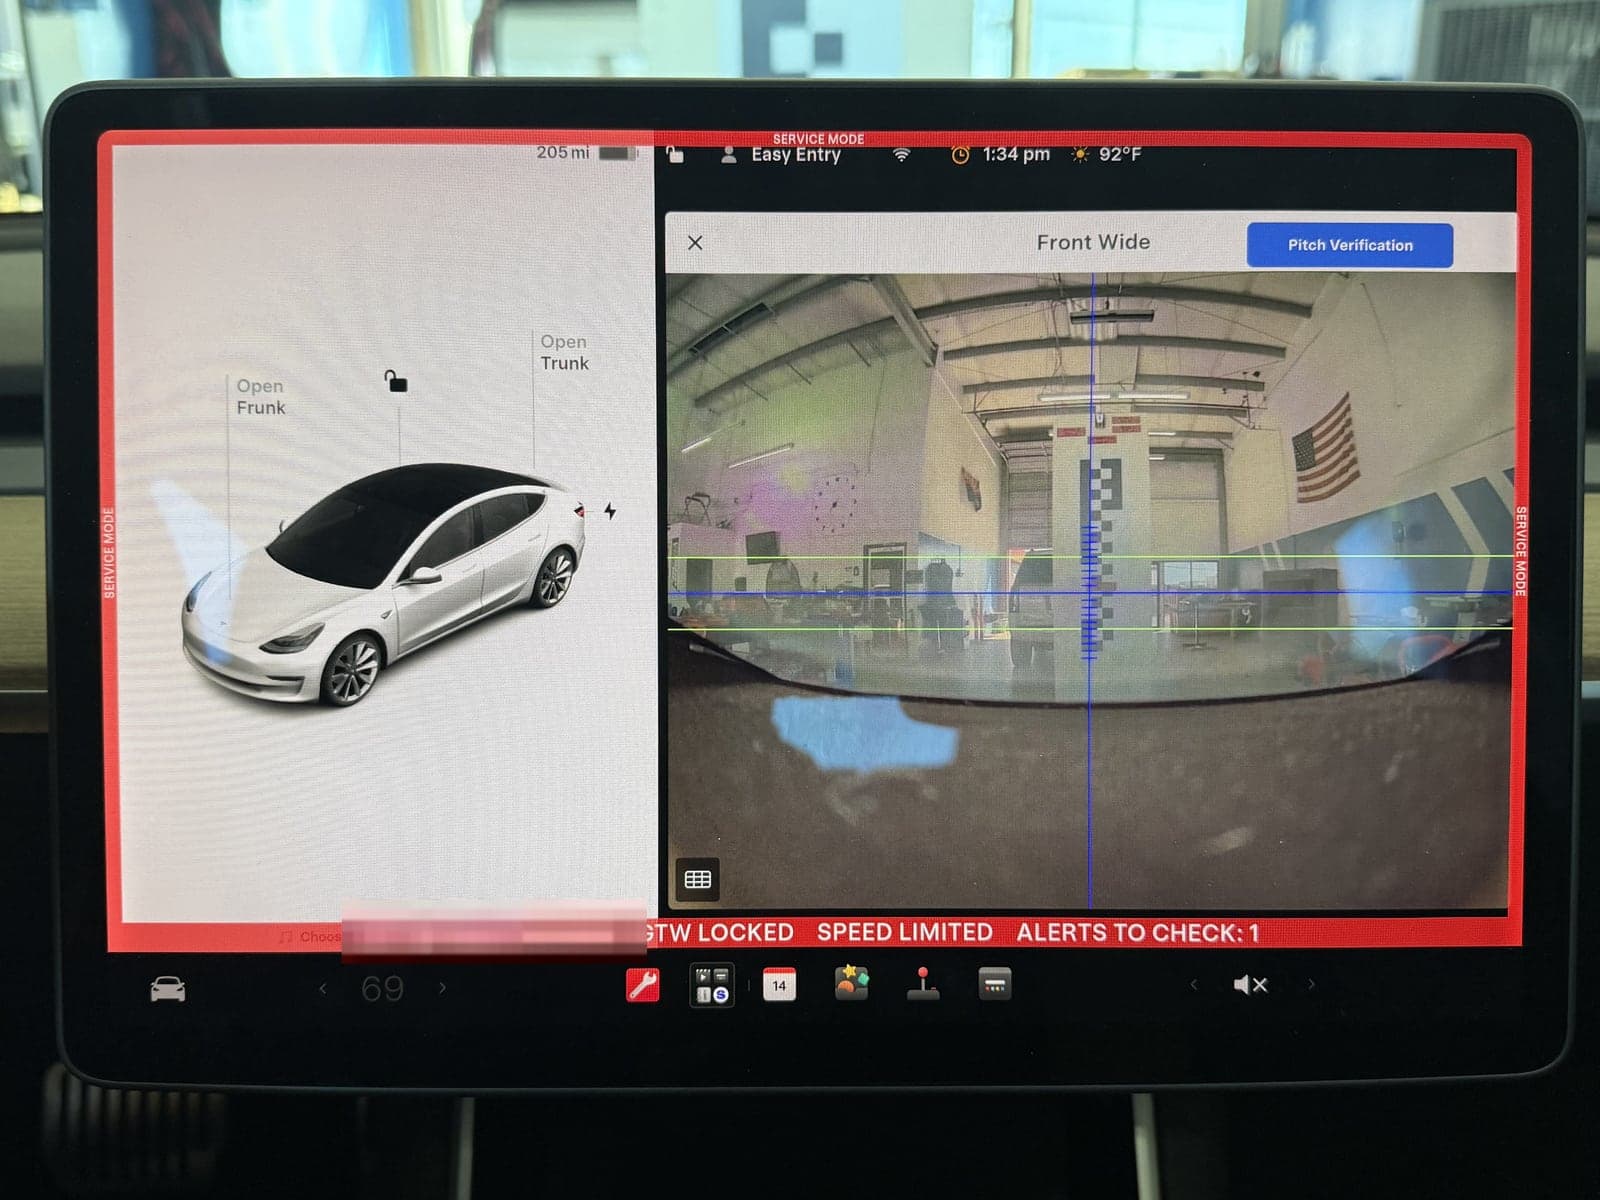
3 of 3: Front Wide camera. Calibration complete
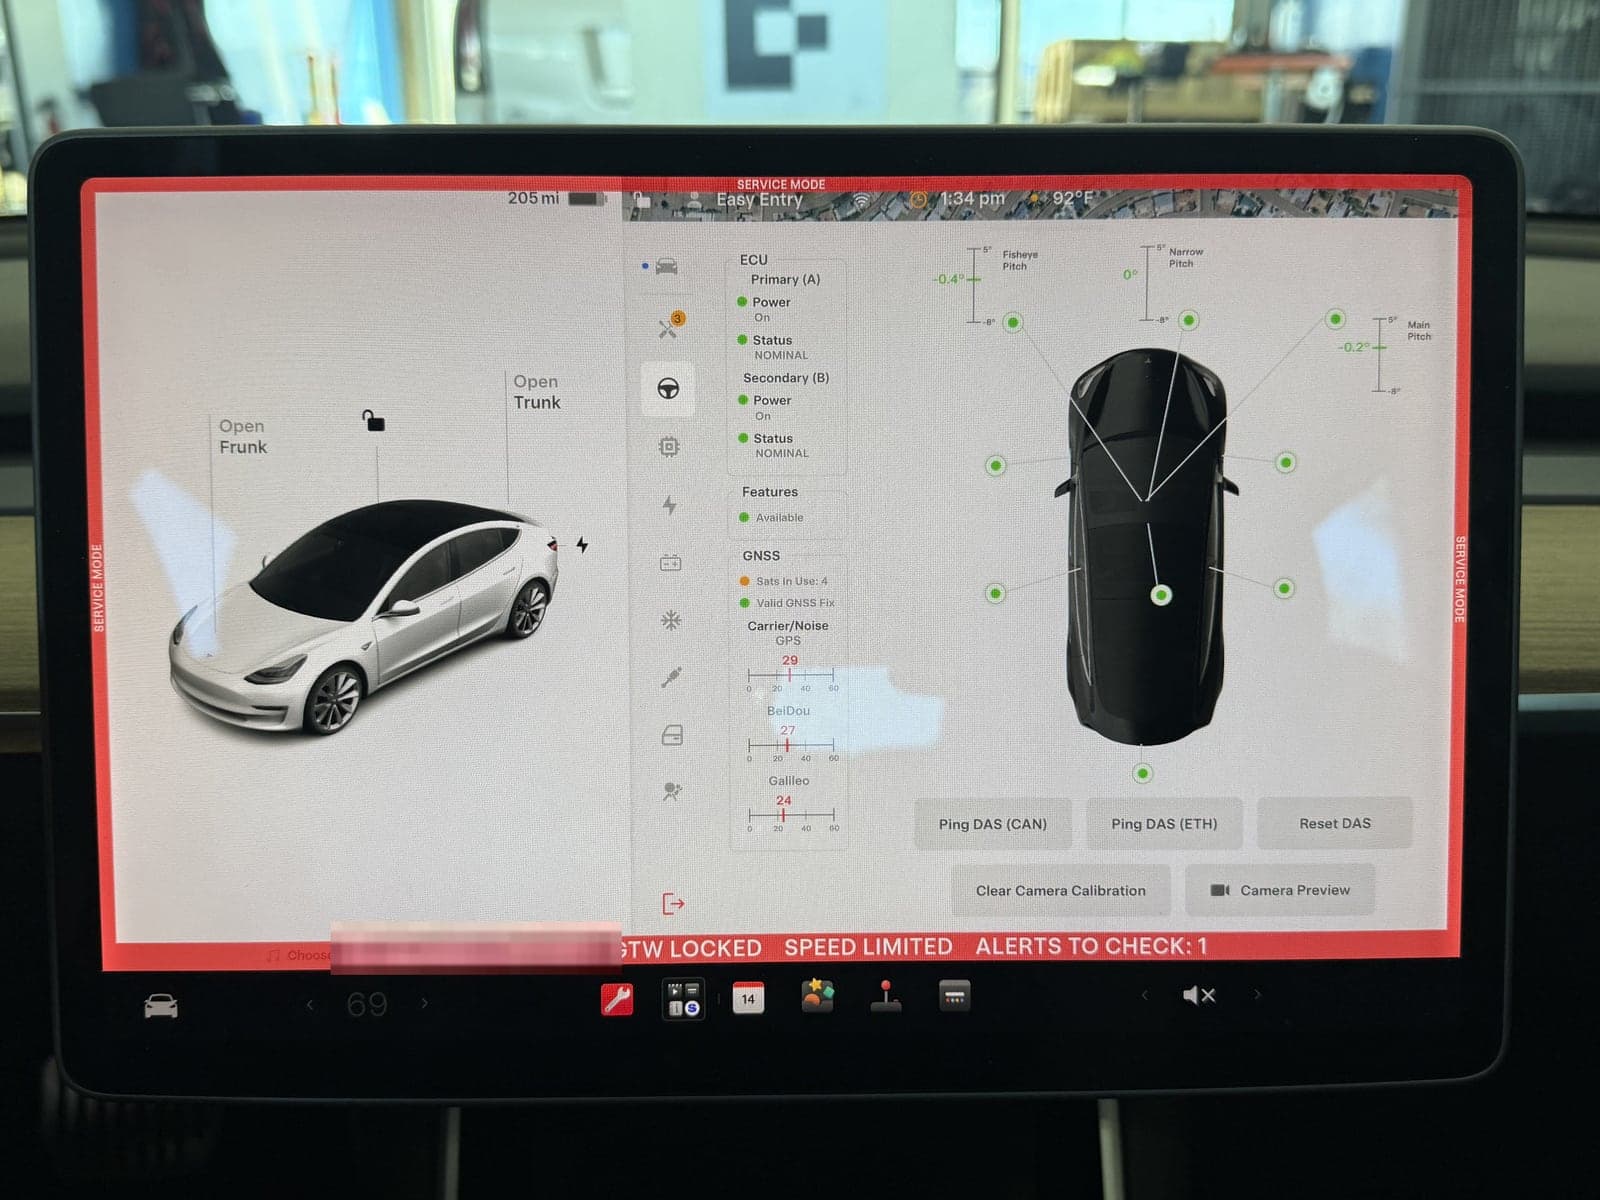
After the recalibration has gone through: the pitch readings for all three forward cameras. - 15
Step 15
Post-Scan, Final Inspection & Safe Drive-Away
Once installation and calibration are complete, we return to Tesla's Service Mode.
We access the Diagnostic Trouble Codes and Active Alerts screen and perform a post-installation diagnostic review.
We photograph the results and compare them with the information documented before beginning the installation.
If additional diagnostic alerts are present, our technicians investigate whether they are related to the windshield replacement or calibration.
We also complete a final inspection of the vehicle. This includes:
- Inspecting the windshield installation.
- Checking the reinstalled components.
- Cleaning the new windshield.
- Removing protective coverings.
- Vacuuming installation-related debris.
- Reviewing applicable camera calibration results.
- Confirming the adhesive manufacturer's minimum safe drive-away time has been satisfied.
Why it matters
Our process doesn't end when the new windshield is installed. We verify the installation, review the calibration results, and compare the vehicle's diagnostic condition before returning it to the customer.
OEM glass, straight from Tesla
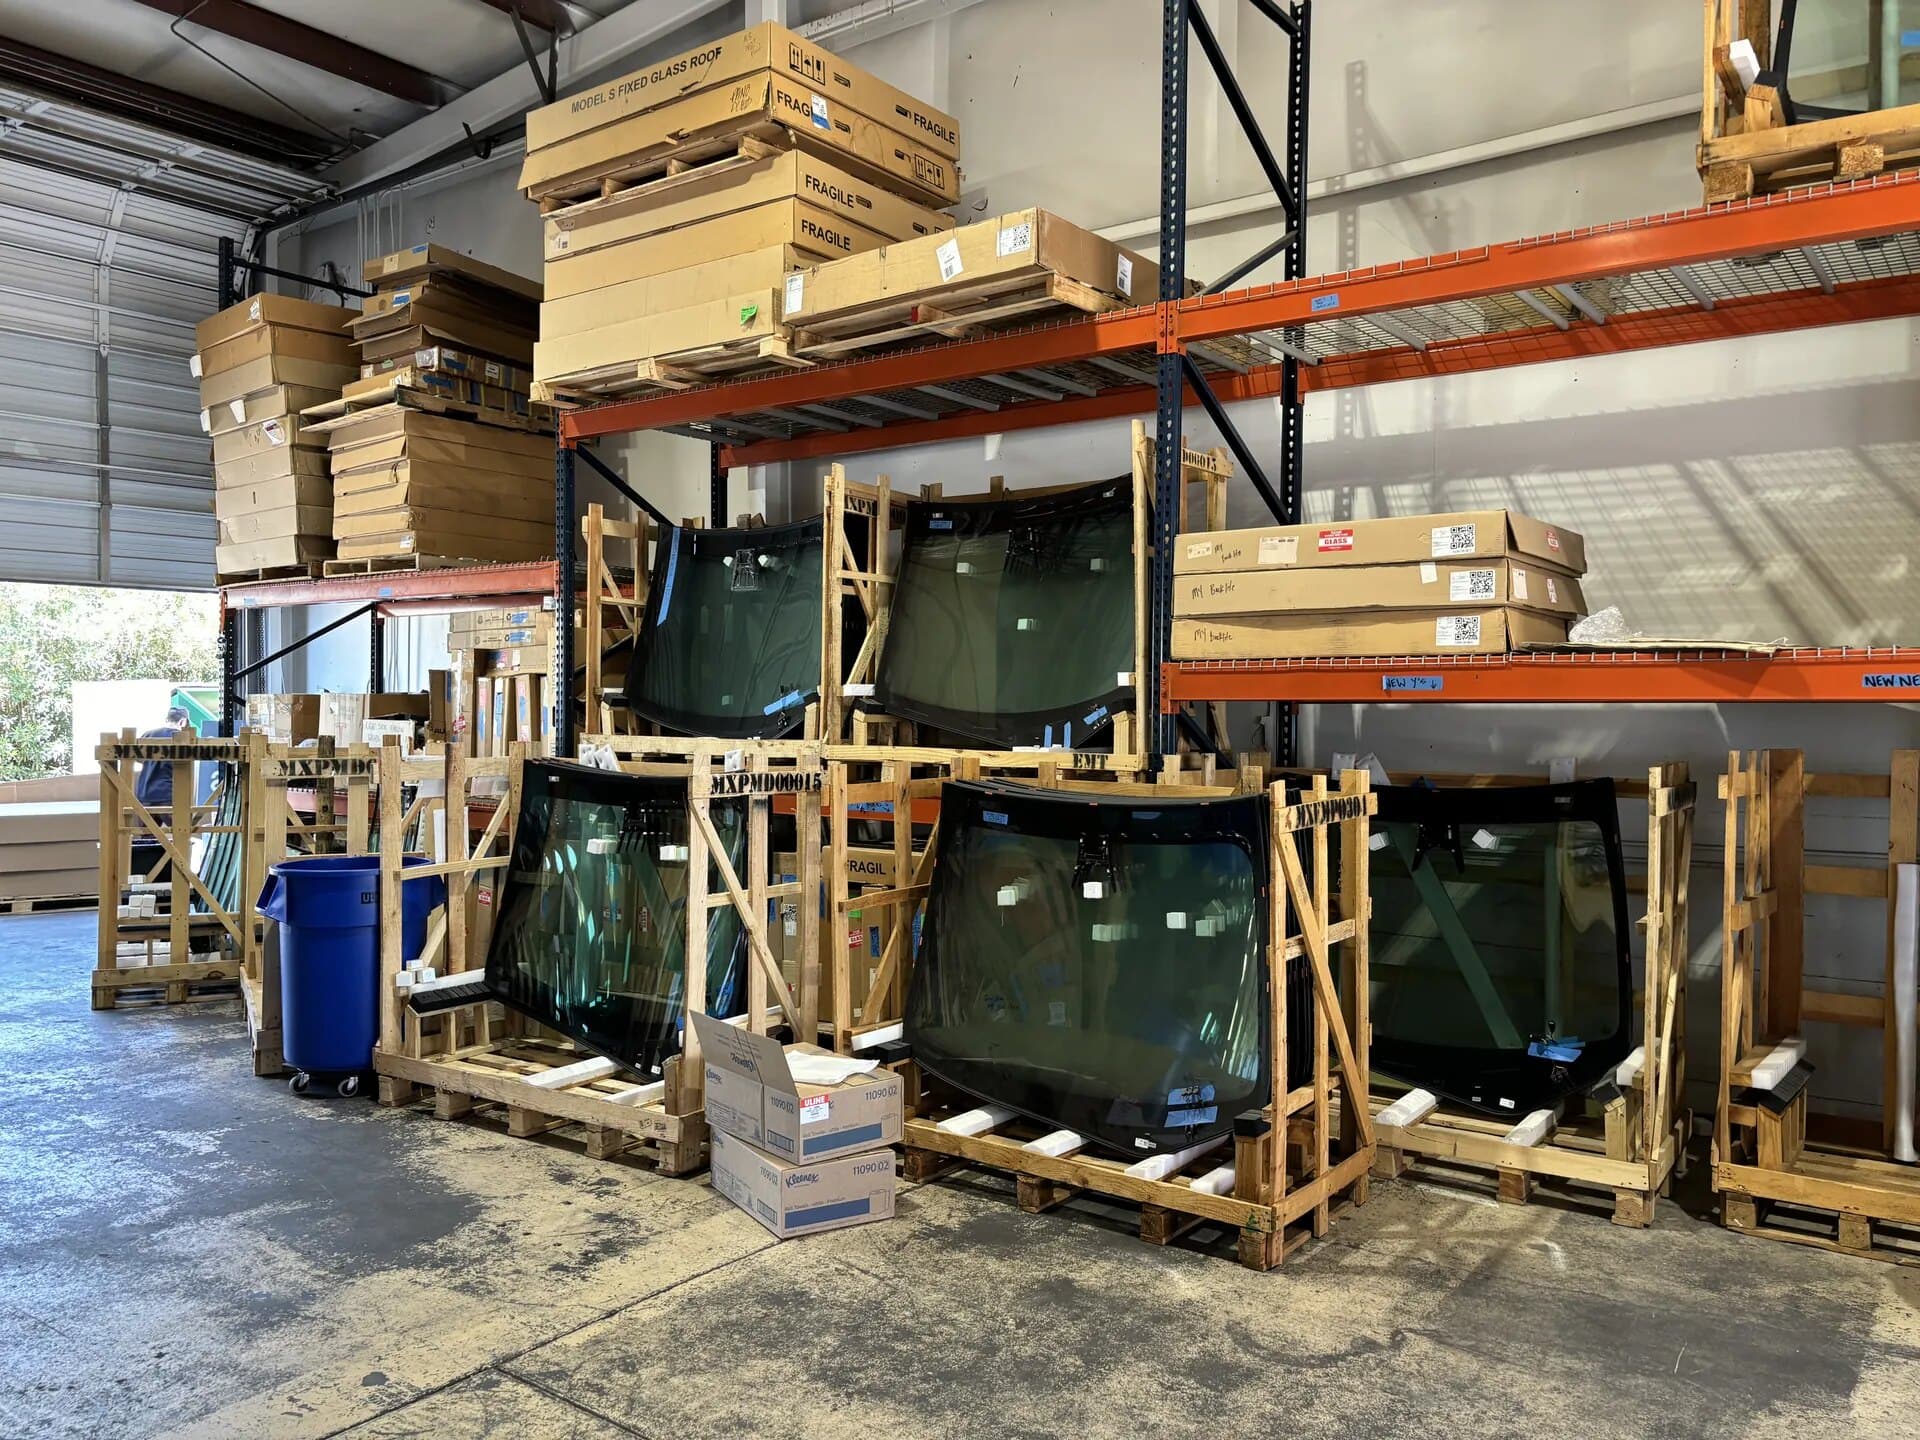
Tesla glass in stock, straight from Tesla.
We receive OEM glass in bulk shipments directly from Tesla and keep a broad inventory in our Arizona warehouse, so the glass for many Teslas is already here. Every piece is cleaned and inspected on our inspection stand before it goes on a car. Call to confirm availability for your model.
- Genuine OEM glass, shipped direct from Tesla
- Windshields, door glass, glass roofs and back glass
- Stocked in our Arizona warehouse
- Inspected before installation
The Blue Chip Difference
Tesla glass is what we do every day.
Tesla vehicles are the most frequently serviced vehicles at Blue Chip Auto Glass.
Our technicians have extensive experience working with Tesla windshields, camera assemblies, and calibration procedures.
From documenting pre-existing diagnostic alerts to performing camera pitch verification and post-installation diagnostics, we take additional steps to help ensure your Tesla receives the attention it deserves.
Our goal isn't simply to replace your windshield. It's to return your Tesla with a properly installed windshield and its required camera calibration procedures completed.
Hear it from our techs
OEM glass, pitch verification and a road calibration, a charge while you wait and a vacuumed car at pickup.
See the process on real Teslas
Watch our team replace Tesla windshields
Filmed on the job by our technicians. Tap a video to watch it with sound.
Three key Tesla differentiators
What you get that a basic replacement skips
- 01 · Documenting your Tesla's condition
Pre- & Post-Installation Diagnostics
We photograph existing diagnostic trouble codes and active alerts before beginning work and compare them with a post-installation scan. This provides transparency and helps identify any new alerts that may require investigation.
- 02 · Going beyond a calibration reset
Tesla Camera Pitch Verification
We use Tesla's Approved Camera Calibration Target to verify the physical alignment of the forward-facing cameras. Our technicians document the results and follow the applicable manufacturer procedures.
- 03 · Completing the process
Road Calibration & Final Verification
We perform the applicable road calibration procedures, monitor the vehicle's calibration status, and review the results. We then complete our post-installation diagnostic inspection and compile a comprehensive written recalibration report.
Questions
Tesla windshield replacement FAQ
Call (602) 885-5330Manufacturer reference: Tesla Model Y Service Manual: Camera — Forward Facing (Pitch Verification). Camera configurations and procedures vary by model, model year and hardware.
Why does my Tesla need camera calibration after windshield replacement?
Tesla's forward-facing cameras are used by various driver assistance features. Windshield replacement can affect the camera assembly's positioning, making manufacturer-specified verification and calibration procedures important.
What is a Tesla Camera Calibration Target?
We use a calibration target with model-specific height markers to verify that the vehicle's camera pitch and angle are within Tesla's acceptable range. When necessary, our technicians make camera pitch adjustments in accordance with the applicable service procedures.
Is resetting the camera calibration enough?
Not necessarily. Resetting calibration data and physically verifying camera alignment are different procedures. At Blue Chip, we perform the applicable camera pitch verification and calibration procedures specified for the vehicle.
How long does Tesla camera calibration take?
Calibration time varies depending on the vehicle, camera hardware, driving conditions, and the applicable manufacturer procedure. Some vehicles may require additional driving to complete calibration.
Do you document my Tesla's diagnostic condition?
Yes. Before beginning work, we photograph the vehicle's Diagnostic Trouble Codes and Active Alerts in Tesla Service Mode. We repeat this process after installation and calibration to identify any new alerts.
Do you replace windshields on all Tesla models?
Blue Chip Auto Glass services Tesla Model 3, Model Y, Model S, Model X, and Cybertruck vehicles. The exact installation and calibration procedures vary depending on the model, year, and hardware configuration.
Your Tesla deserves more than a basic windshield replacement.
From careful vehicle inspection and diagnostic documentation to professional installation and camera pitch verification, our process is designed around quality, transparency, and attention to detail. Experience the Blue Chip difference.
Request Repair Or Replacement Service
Answer a few quick questions and we'll get back to you fast, whether you're paying yourself or using insurance.
Prefer to talk to someone?
(602) 885-5330
Mon–Fri · 7:30 a.m.–5:00 p.m.